Launching MOLA-LO
1. MOLA-LO GUI applications
All these commands are actually shortcuts (small scripts) to launch mola-cli and
one of the predefined mola-cli launch files containing one dataset source
and the mola_viz module, which enables the real-time GUI visualization.
First, we enumerate the existing scripts together with their specific environment variables and CLI usage, next we list the environment variables common to all of them.
Note
Apart of the environment variables defined here, which are specific to these mola-cli launch files (see: role of MOLA-LO module), remember that there are many additional parameters associated to the LO pipeline YAML file, listed here.
Common elements of all GUI apps
mola_viz provides a unified API for all MOLA modules to display custom UI subwindows, controls, and 3D objects.
Next we describe how to manipulate or interpret the common elements in this UI, which is the same in all MOLA-LO
programs, except mola-lidar-odometry-cli which is explicitly design not to have any GUI.
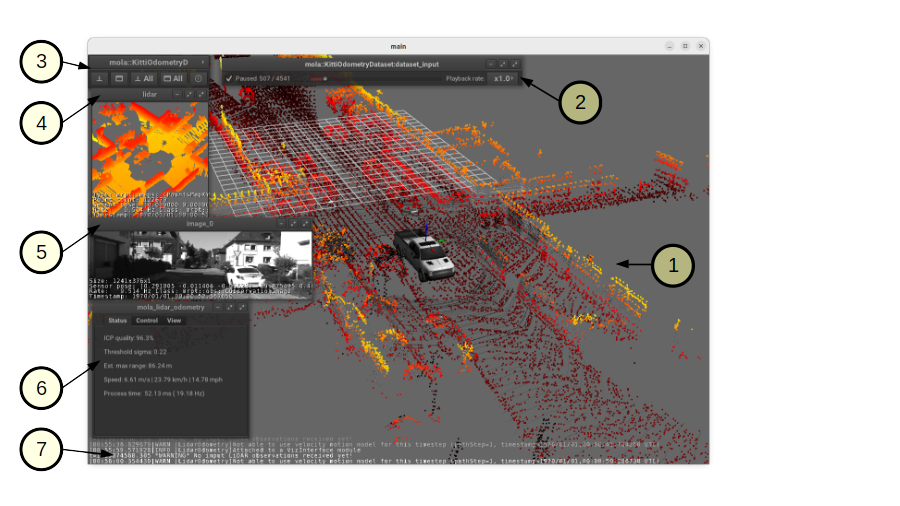
The labeled parts in the GUI are:
The main space of the “main” GUI window: used to render the latest 3D local map, together with the incoming raw scan, the 3D vehicle model (if provided), etc. Use the same mouse and keyboard shortcuts than in any MRPT 3D window to rotate the view, pan and zoom, etc. The rest of small windows floating in this large windows are dubbed “subwindows”.
Dataset source UI: All dataset sources (offline datasets, rawlog, rosbag2, etc.) offer a common API that can be operated through these controls to pause or resume the publication of observations to the LiDAR front-end or to change the playback speed. Most datasets also support directly jumping forth and back in time by clicking on the time slider (It is recommended to pause mapping and reset the map while doing so!).
Main subwindows control panel: You can minimize, restore, etc. subwindows from here.
Raw LiDAR view: A subwindow with the details (type of observation, timestamp, etc.) of incoming raw scans.
Camera view: Although not used by the LO, it is useful sometimes to see the environment from camera images.
mola_lidar_odometry module own UI: Direct access to the internals of the LO module. There are tabs providing direct access to variables that normally can be set via environment variables, to make it easier to record a simple-maps directly from the GUI.
Log messages with priority higher than
INFOwill be dumped to both, the terminal, and to this scrolling transparent terminal at the bottom.
Choosing a visualizer module
MOLA provides two alternative visualizer modules, both allowing MRPT’s OpenGL rendering, that can be used with all GUI applications:
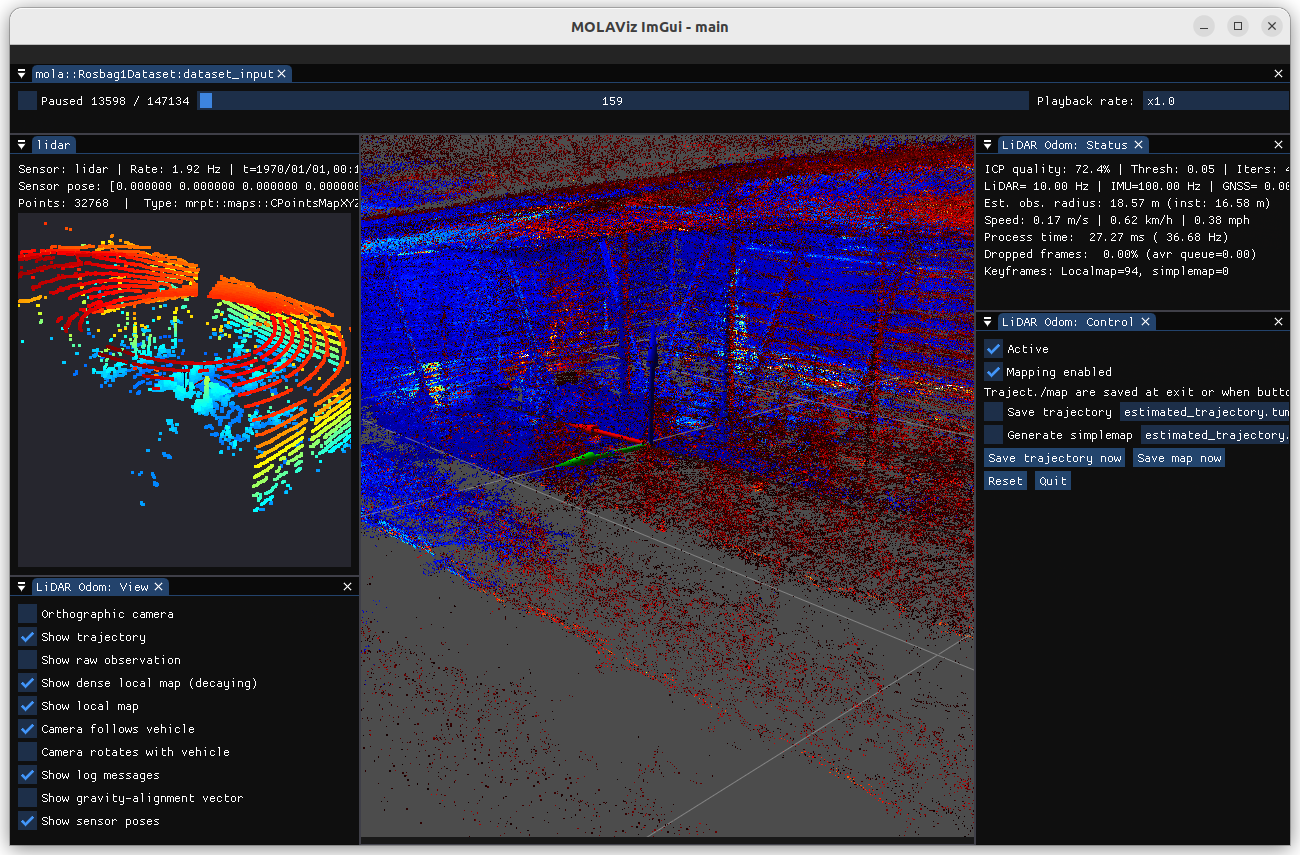
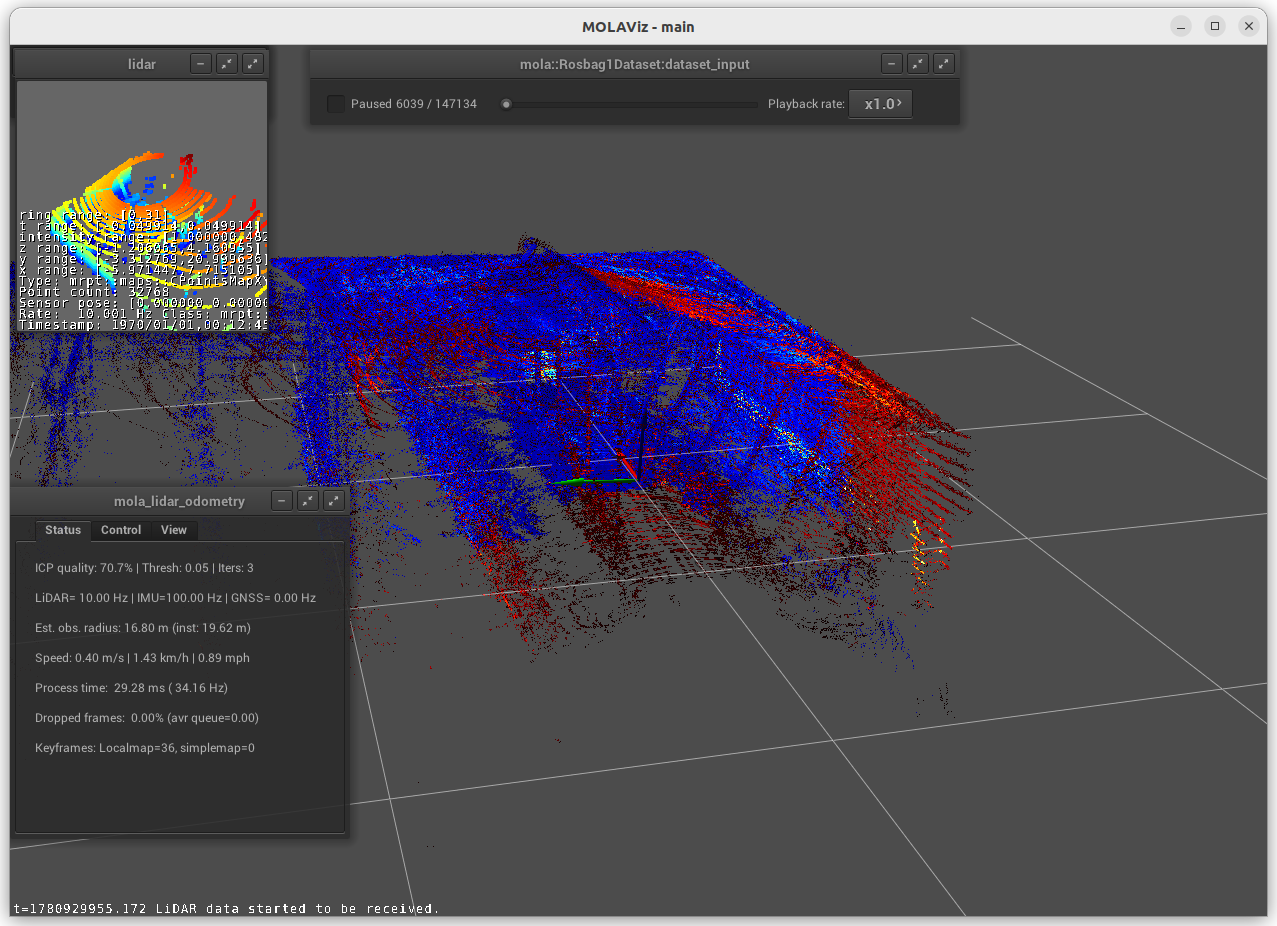
MolaVizImGui (
mola_viz_imgui): The most recent and modern visualizer built on Dear ImGui (default).MolaViz (
mola_viz): An older visualizer, based on nanogui.
MolaViz (default) |
MolaVizImGui |
|---|---|
|
|
To switch between them, set the MOLA_GUI_MODULE environment variable before launching
any of the GUI applications:
# Explicitly select MolaViz (nanogui-based):
MOLA_GUI_MODULE=mola::MolaViz mola-lo-gui-rosbag2 /path/to/your/dataset.mcap

# Select the alternative MolaVizImGui (Dear ImGui-based):
MOLA_GUI_MODULE=mola::MolaVizImGui mola-lo-gui-rosbag2 /path/to/your/dataset.mcap
Note
MolaViz is the current default. MolaVizImGui is under active development
and may become the default in a future release once it reaches full feature parity.
1.1. mola-lo-gui-rosbag2
Tip
See the MOLA in ROS 2 cookbook §5.1 for a
side-by-side walkthrough of mola-lo-gui-rosbag2 with namespaced
bags, smoother, and live parameter editor.
This command will open the mola_viz GUI and build a map from ROS 2 bags:
# Use LIO (Lidar-Inertial) from a live Ouster:
MOLA_DESKEW_METHOD=MotionCompensationMethod::IMU \
MOLA_IMU_TOPIC="/ouster/imu" \
MOLA_LIDAR_TOPIC="/ouster/points" \
MOLA_TF_BASE_LINK="os_sensor" \
mola-lo-gui-rosbag2 /path/to/your/dataset.mcap

# Usage for LO (LiDAR odometry) a single bag file:
MOLA_LIDAR_TOPIC=/ouster/points \
mola-lo-gui-rosbag2 /path/to/your/dataset.mcap

# Usage for a directory with split bag files:
# Note: in this case, the directory is expected to contain a metadata.yaml to determine "rosbag_storage_id".
MOLA_LIDAR_TOPIC=/ouster/points \
mola-lo-gui-rosbag2 /path/to/your/dataset_directory/
Does your bag lack /tf?
By default, MOLA will try to use tf2 messages in the rosbag to find out the relative pose
of the LiDAR sensor with respect to the vehicle frame (default: base_link). If your system does not have tf data
(for example, if you only launched the LiDAR driver node) you must then set the environment variable MOLA_USE_FIXED_LIDAR_POSE=true
to use the default (identity) sensor pose on the vehicle. So, launch it like:
MOLA_USE_FIXED_LIDAR_POSE=true \
MOLA_LIDAR_TOPIC=/ouster/points \
mola-lo-gui-rosbag2 /path/to/your/dataset.mcap
In the common case of launching only the Ouster ROS 2 driver node, you may already have the
/tf_static messages defining the TF frames os_sensor, os_lidar, and os_imu, so
you can make use of them with:
MOLA_TF_BASE_LINK=os_sensor  \
MOLA_LIDAR_TOPIC=/ouster/points \
mola-lo-gui-rosbag2 /path/to/your/dataset.mcap
Environment variables specific for mola-lo-gui-rosbag2:
See complete mola launch YAML listing
File: mola-cli-launchs/lidar_odometry_from_rosbag2.yaml
# -----------------------------------------------------------------------------
#                        SLAM system definition for MOLA
# This file defines:
# An input sensor from a ROS 2 bag file, and the MOLA Visualizer.
# -----------------------------------------------------------------------------

modules:
  # =====================
  # MolaViz
  # =====================
  - name: viz
    type: ${MOLA_GUI_MODULE|mola::MolaVizImGui}
    verbosity_level: "${MOLA_VERBOSITY_MOLA_VIZ|INFO}"
    params:
      imgui_app_name: lidar_odometry_from_rosbag2

  # =====================
  # LIDAR ODOMETRY
  # =====================
  - name: lidar_odom
    type: mola::LidarOdometry
    verbosity_level: "${MOLA_VERBOSITY_MOLA_LO|INFO}"
    raw_data_source: "dataset_input"
    # This includes here a whole block "params: (...)"
    # with the LIDAR-Odometry pipeline configuration:
    params: "${MOLA_ODOMETRY_PIPELINE_YAML|../pipelines/lidar3d-default.yaml}"

  # =====================
  # State Estimation
  # =====================
  - name: state_estimation
    type: "${MOLA_STATE_ESTIMATOR|mola::state_estimation_simple::StateEstimationSimple}"
    verbosity_level: "${MOLA_VERBOSITY_MOLA_STATE_ESTIMATOR|INFO}"
    raw_data_source: "dataset_input"

    # This includes here a whole block "params: (...)":
    params: "${MOLA_STATE_ESTIMATOR_YAML|../state-estimator-params/state-estimation-simple.yaml}"

  # =========================
  # Offline dataset source
  # =========================
  - type: mola::Rosbag2Dataset
    name: dataset_input
    verbosity_level: "${MOLA_VERBOSITY_ROSBAG2|INFO}"
    export_to_rawlog: ${MOLA_ROS2BAG_EXPORT_TO_RAWLOG_FILE|''}

    # In Rosbag2Dataset, this execution rate (Hz) determines the
    # maximum rate of publishing topics from the bag file.
    # If a message in the bag has an actually rate higher than this, their
    # messages will be still sent out with the correct timestamps, but physically
    # in bursts.
    execution_rate: 50 # Hz
    #verbosity_level: INFO
    quit_mola_app_on_dataset_end: ${MOLA_QUIT_ON_DATASET_END|false}

    # Optional visualization of raw sensor streams in the MolaViz GUI
    gui_preview_sensors:
      - raw_sensor_label: "${MOLA_LIDAR_NAME|lidar}"
        decimation: 1
        win_pos: 5 5 400 400
      #- raw_sensor_label: '/ouster/range_image'
      #  decimation: 1
      #  win_pos: 5 420 400 400

    params:
      # We use an environment variable to force the user to specify a bag file:
      rosbag_filename: ${MOLA_INPUT_ROSBAG2}
      time_warp_scale: ${MOLA_TIME_WARP|1.0}
      start_paused: ${MOLA_DATASET_START_PAUSED|false}

      base_link_frame_id: "${MOLA_TF_BASE_LINK|base_link}"

      # /tf topic names in the bag. Override for namespaced bags,
      # e.g. MOLA_TF_TOPIC=/robot1/tf MOLA_TF_STATIC_TOPIC=/robot1/tf_static
      tf_topic: "${MOLA_TF_TOPIC|/tf}"
      tf_static_topic: "${MOLA_TF_STATIC_TOPIC|/tf_static}"

      # 'sensors' contains maps from output "sensorLabel"s, to the
      # configuration of that data source (mainly, 'type', 'topic'):
      # If no 'sensors' entry is given, all ROSBAG topics will be exposed
      # to the MOLA subsystem. Note that if you want to override sensor poses
      # (or if you do not have /tf), it is mandatory to define 'sensors' and
      # define 'fixed_sensor_pose' for each sensor here:
      sensors:
        - topic: ${MOLA_LIDAR_TOPIC|'/ouster/points'}
          type: CObservationPointCloud
          sensorLabel: "${MOLA_LIDAR_NAME|lidar}"
          # If present, this will override whatever /tf tells about the sensor pose:
          fixed_sensor_pose: "${LIDAR_POSE_X|0} ${LIDAR_POSE_Y|0} ${LIDAR_POSE_Z|0} ${LIDAR_POSE_YAW|0} ${LIDAR_POSE_PITCH|0} ${LIDAR_POSE_ROLL|0}" # 'x y z yaw_deg pitch_deg roll_deg'
          use_fixed_sensor_pose: ${MOLA_USE_FIXED_LIDAR_POSE|false}

        # For GPS messages of type 'sensor_msgs/NavSatFix' or 'gps_msgs/GpsFix'
        - topic: ${MOLA_GNSS_TOPIC|'/gps'}
          sensorLabel: "gps"
          #type: CObservationGPS  # This will be determined automatically by Rosbag2Dataset
          is_optional: true
          # If present, this will override whatever /tf tells about the sensor pose:
          fixed_sensor_pose: "${GNSS_POSE_X|0} ${GNSS_POSE_Y|0} ${GNSS_POSE_Z|0} ${GNSS_POSE_YAW|0} ${GNSS_POSE_PITCH|0} ${GNSS_POSE_ROLL|0}" # 'x y z yaw_deg pitch_deg roll_deg''
          use_fixed_sensor_pose: ${MOLA_USE_FIXED_GNSS_POSE|false}

        - topic: ${MOLA_IMU_TOPIC|'/imu'}
          sensorLabel: "imu"
          type: CObservationIMU
          # If present, this will override whatever /tf tells about the sensor pose:
          fixed_sensor_pose: "${IMU_POSE_X|0} ${IMU_POSE_Y|0} ${IMU_POSE_Z|0} ${IMU_POSE_YAW|0} ${IMU_POSE_PITCH|0} ${IMU_POSE_ROLL|0}" # 'x y z yaw_deg pitch_deg roll_deg''
          use_fixed_sensor_pose: ${MOLA_USE_FIXED_IMU_POSE|false}
          # If true, use the bag's own recv/storage time for this sensor's
          # observations instead of the ROS message header stamp. Workaround
          # for drivers that stamp with a monotonic/uptime clock instead of
          # wall-clock epoch time (seen with some IMU drivers), which
          # otherwise trips the "mis-timestamped sensors" time reference
          # reset. Default false.
          use_bag_recv_time_as_timestamp: ${MOLA_IMU_USE_BAG_RECV_TIME|false}

        # 2D wheel odometry (disabled by default)
        - topic: ${MOLA_ODOMETRY_TOPIC|''}
          sensorLabel: ${MOLA_ODOM_SENSOR_LABEL|odom_wheels}
          type: CObservationOdometry
MOLA_TIME_WARP(Default: 1.0): Time wrapping for rosbag replay.MOLA_DATASET_START_PAUSED(Default: false): Start with replay paused. Then can be resumed from the GUI.
Also, see variables to control sensor inputs, including manually-provided sensor poses for the LiDAR, IMU, or GNNS sensors.
1.2. mola-lo-gui-rawlog
This command will open the mola_viz GUI and build a map from dataset stored as a .rawlog file.
Environment variables specific for mola-lo-gui-rawlog:
See complete mola launch YAML listing
File: mola-cli-launchs/lidar_odometry_from_rawlog.yaml
# -----------------------------------------------------------------------------
#                        SLAM system definition for MOLA
# This file defines:
# An input sensor from a ROS 2 topic, and the MOLA Visualizer.
# -----------------------------------------------------------------------------

modules:
  # =====================
  # MolaViz
  # =====================
  - name: viz
    type: ${MOLA_GUI_MODULE|mola::MolaVizImGui}
    verbosity_level: "${MOLA_VERBOSITY_MOLA_VIZ|INFO}"
    params:
      imgui_app_name: lidar_odometry_from_rawlog

  # Offline or online sensory data sources =====================
  # =====================
  # KittiOdometryDataset
  # =====================
  - name: dataset_input
    type: mola::RawlogDataset
    execution_rate: 150 # Hz
    #verbosity_level: INFO
    quit_mola_app_on_dataset_end: ${MOLA_QUIT_ON_DATASET_END|false}

    gui_preview_sensors:
      - raw_sensor_label: ${MOLA_LIDAR_NAME|lidar}
        decimation: 1
        win_pos: 5 40 600 200 # [x,y,width,height]
      - raw_sensor_label: ${MOLA_CAMERA_NAME|camera}
        decimation: 1
        win_pos: 5 370 600 200
    params:
      rawlog_filename: ${MOLA_INPUT_RAWLOG}
      time_warp_scale: ${MOLA_TIME_WARP|1.0}
      read_all_first: ${MOLA_INPUT_RAWLOG_READ_ALL_FIRST|false} # read from disk as needed
      start_paused: ${MOLA_DATASET_START_PAUSED|false}

  - name: lidar_odom
    type: mola::LidarOdometry
    verbosity_level: "${MOLA_VERBOSITY_MOLA_LO|INFO}"
    raw_data_source: "dataset_input"
    # This includes here a whole block "params: (...)"
    # with the LIDAR-Odometry pipeline configuration:
    params: "${MOLA_ODOMETRY_PIPELINE_YAML|../pipelines/lidar3d-default.yaml}"

  - name: state_estimation
    type: "${MOLA_STATE_ESTIMATOR|mola::state_estimation_simple::StateEstimationSimple}"
    verbosity_level: "${MOLA_VERBOSITY_MOLA_STATE_ESTIMATOR|INFO}"

    # This includes here a whole block "params: (...)":
    params: "${MOLA_STATE_ESTIMATOR_YAML|../state-estimator-params/state-estimation-simple.yaml}"
MOLA_TIME_WARP(Default: 1.0): Time wrapping for rosbag replay.MOLA_DATASET_START_PAUSED(Default: false): Start with replay paused. Then can be resumed from the GUI.MOLA_INPUT_RAWLOG_READ_ALL_FIRST(Default:false): Set totrueto load the whole .rawlog file at start up, enabling the use of the dataset timeline slider in the UI.
1.3. mola-lo-gui-kitti
Runs MOLA-LO on a sequence of the KITTI odometry dataset [GLSU13].
How to run it
Download the KITTI Odometry dataset and extract them anywhere, such as the files layout matches the expected tree structure described in class mola::KittiOdometryDataset.
Set the environment variable
KITTI_BASE_DIRto the root “KITTI” directory in the tree layout above:export KITTI_BASE_DIR=/path/to/dataset/
And run it for the desired sequence number:
# mola-lo-gui-kitti SEQUENCE
# SEQUENCE: 00,01,...21

# Example:
mola-lo-gui-kitti 00
Inner workings
mola-cli launch file: mola-cli-launchs/lidar_odometry_from_kitti.yaml
Dataset C++ MOLA module: class mola::KittiOdometryDataset
1.4. mola-lo-gui-kitti360
Runs MOLA-LO on a sequence of the KITTI-360 dataset.
1.5. mola-lo-gui-mulran
Runs MOLA-LO on a sequence of the Mulran dataset.
How to run it
Download the MulRan dataset ([KPC+20]) from their website, and extract the files anywhere in your system such as the files layout is as expected by mola::MulranDataset.
Set the environment variable
MULRAN_BASE_DIRto the root directory of your dataset, for example:export MULRAN_BASE_DIR=/home/myuser/mulran/
And run it for the desired sequence:
# mola-lo-gui-mulran SEQUENCE
# SEQUENCE: KAIST01, KAIST02,..., DCC03,...

# Example:
mola-lo-gui-mulran KAIST01

# Example using the 3D-NDT alternative pipeline:
PIPELINE_YAML=$(ros2 pkg prefix mola_lidar_odometry)/share/mola_lidar_odometry/pipelines/lidar3d-ndt.yaml \
MOLA_LOCAL_VOXELMAP_RESOLUTION=5.0 \
mola-lo-gui-mulran KAIST01
Inner workings
mola-cli launch file: mola-cli-launchs/lidar_odometry_from_mulran.yaml
Dataset C++ MOLA module: mola::MulranDataset
1.6. Common env variables
PIPELINE_YAML(Default: full path to installedlidar3d-default.yaml): Can be set to override the default pipeline and experiment with custom MOLA-LO systems described through a modified YAML file. Example: see the example for mola-lo-gui-mulran.
2. LiDAR odometry CLI
mola-lidar-odometry-cli is a standalone command line program to run
MOLA-LO on a dataset in an offline fashion.
The dataset is processed as fast as possible using all available CPU cores.
Its outputs include the vehicle trajectory (as a file in TUM format)
and the simple-map, which can be analyzed with sm-cli
and used to generate metric maps using sm2mm.
Hint
We recommend using evo to visualize
and compare the output TUM trajectories. You can also use
mrpt::poses::CPose3DInterpolator
to load and parse TUM files in C++, or its Python wrapped version within pymrpt.
2.1. Usage examples
Process a ROS 2 bag
mola-lidar-odometry-cli \
  -c $(ros2 pkg prefix mola_lidar_odometry)/share/mola_lidar_odometry/pipelines/lidar3d-default.yaml \
  --state-estimator-param-file $(ros2 pkg prefix mola_lidar_odometry)/share/mola_lidar_odometry/state-estimator-params/state-estimation-simple.yaml \
  --input-rosbag2 /PATH/TO/YOUR/rosbag.mcap \
  --lidar-sensor-label /ouster/points \
  --output-tum-path trajectory.tum \
  --output-simplemap myMap.simplemap
Note
Remember changing --lidar-sensor-label /ouster/points to your actual raw (unfiltered) LiDAR topic (sensor_msgs/PointCloud2).
Does your bag lack /tf?
By default, mola-lidar-odometry-cl will try to use tf2 messages in the rosbag to find out the relative pose
of the LiDAR sensor with respect to the vehicle frame (default: base_link). If your system does not have tf data
(for example, if you only launched the LiDAR driver node) you must then set the environment variable MOLA_USE_FIXED_LIDAR_POSE=true
to use the default (identity) sensor pose on the vehicle. So, launch it like:
MOLA_USE_FIXED_LIDAR_POSE=true \
mola-lidar-odometry-cli \
  [...]  # the rest does not change.
If you forget adding this flag, tons of errors like this will show up:
[ERROR|mola::Rosbag2Dataset:dataset_input] findOutSensorPose (label='lidar', hesai_lidar<-base_link): "base_link" passed to lookupTransform argument target_frame does not exist.
[ERROR|mola::Rosbag2Dataset:dataset_input] Exception while processing topic message (ignore if the error stops later one, e.g. missing /tf):
==== MRPT exception ====
Message:  Assert condition failed: sensorPoseOK
Want to visualize the output in real-time?
mola-lidar-odometry-cli is explicitly designed to be as fast as possible by not interacting with any GUI or messaging system.
If you prefer to visualize the results as they are being processed, there are two options:
Use the built-in GUI in the provided apps: mola-lo-gui-rosbag2.
Replay the bag with ros2 bag play and launch the ROS 2 launch file so you can use RViz2 or FoxGlove for visualization.aunch
More parameters
If using the default pipeline, the lidar3d-gicp.yaml pipeline file defines plenty
of additional parameters and options that you can explore.
Process a KITTI dataset sequence
First, make sure of downloading and extracting the dataset files following the layout
expected by mola::KittiDataset.
Then, set the KITTI_BASE_DIR environment variable and launch the desired sequence (e.g. 00) with:
export KITTI_BASE_DIR=/path/to/kitti_root

mola-lidar-odometry-cli \
  -c $(ros2 pkg prefix mola_lidar_odometry)/share/mola_lidar_odometry/pipelines/lidar3d-default.yaml \
  --state-estimator-param-file $(ros2 pkg prefix mola_lidar_odometry)/share/mola_lidar_odometry/state-estimator-params/state-estimation-simple.yaml \
  --input-kitti-seq 00 \
  --output-tum-path kitti-00.tum
More parameters
If using the default pipeline, the lidar3d-gicp.yaml pipeline file defines plenty
of additional parameters and options that you can explore.
2.2. Complete list of arguments
USAGE:

mola-lidar-odometry-cli  [--input-paris-luco] [--input-mulran-seq
                            <KAIST01>] [--input-kitti360-seq <00>]
                            [--kitti-correction-angle-deg <0.205
                            [degrees]>] [--input-kitti-seq <00>]
                            [--input-rosbag2 <dataset.mcap>]
                            [--input-rawlog <dataset.rawlog>]
                            [--lidar-sensor-label <lidar1>] [--skip-first-n
                            <Number of dataset entries to skip>]
                            [--only-first-n <Number of dataset entries to
                            run>] [--output-simplemap
                            <output-map.simplemap>] [--output-twist
                            <output-twist.txt>] [--output-tum-path
                            <output-trajectory.txt>]
                            [--state-estimator-param-file
                            </path/to/params.yaml>] [--state-estimator
                            <(StateEstimationSimple
                            |StateEstimationSmoother)>] [-l <foobar.so>]
                            [-v <INFO>] -c <demo.yml> [--] [--version]
                            [-h]


Where:

--input-paris-luco
    INPUT DATASET: Use Paris Luco dataset (unique sequence=00)

--input-mulran-seq <KAIST01>
    INPUT DATASET: Use Mulran dataset sequence KAIST01|KAIST01|...

--input-kitti360-seq <00>
    INPUT DATASET: Use KITTI360 dataset sequence number 00|01|...|test_00
    |...

--kitti-correction-angle-deg <0.205 [degrees]>
    Correction vertical angle offset {see Deschaud,2018}

--input-kitti-seq <00>
    INPUT DATASET: Use KITTI dataset sequence number 00|01|...

--input-rosbag2 <dataset.mcap>
    INPUT DATASET: rosbag2. Input dataset in rosbag2 format {*.mcap}

--input-rawlog <dataset.rawlog>
    INPUT DATASET: rawlog. Input dataset in rawlog format {*.rawlog}

--lidar-sensor-label <lidar1>
    If provided, this supersedes the values in the 'lidar_sensor_labels'
    entry of the odometry pipeline, defining the sensorLabel/topic name to
    read LIDAR data from. It can be a regular expression {std::regex}

--skip-first-n <Number of dataset entries to skip>
    Skip the first N dataset entries {0=default, not used}

--only-first-n <Number of dataset entries to run>
    Run for the first N steps only {0=default, not used}

--output-simplemap <output-map.simplemap>
    Enables building and saving the simplemap for the mapping session

--output-twist <output-twist.txt>
    Save the estimated twist as a TXT file

--output-tum-path <output-trajectory.txt>
    Save the estimated path as a TXT file using the TUM file format {see
    evo docs}

--state-estimator-param-file </path/to/params.yaml>
    Path to YAML parameters file to configure the state estimator.

--state-estimator <(StateEstimationSimple|StateEstimationSmoother)>
    The C++ class name of the state estimator to use

-l <foobar.so>,  --load-plugins <foobar.so>
    One or more {comma separated} *.so files to load as plugins

-v <INFO>,  --verbosity <INFO>
    Verbosity level: ERROR|WARN|INFO|DEBUG {Default: INFO}

-c <demo.yml>,  --config <demo.yml>
    (required)  Input YAML config file (required) (*.yml)

--,  --ignore_rest
    Ignores the rest of the labeled arguments following this flag.

--version
    Displays version information and exits.

-h,  --help
    Displays usage information and exits.
3. ROS 2 node
A ROS 2 node is provided for running MOLA-LO live on a robot or vehicle where sensor drivers are already working and publishing ROS topics.
Tip
For a full matrix of supported live configurations (Simple vs Smoother, REP-105 on/off, namespaces, GNSS modes) see the MOLA in ROS 2 cookbook.
Does your system lack /tf?
By default, MOLA-LO will try to use tf2 messages to find out the relative pose
of the LiDAR sensor with respect to the vehicle frame (default: base_link). If your system does not have tf data
(for example, if you only launched the LiDAR driver node) you must then set the environment variable MOLA_USE_FIXED_LIDAR_POSE=true
to use the default (identity) sensor pose on the vehicle.
3.1. ROS 2 launch file: live LiDAR odometry
It is documented here.
3.2. ROS 2 launch file: LiDAR odometry for KITTI
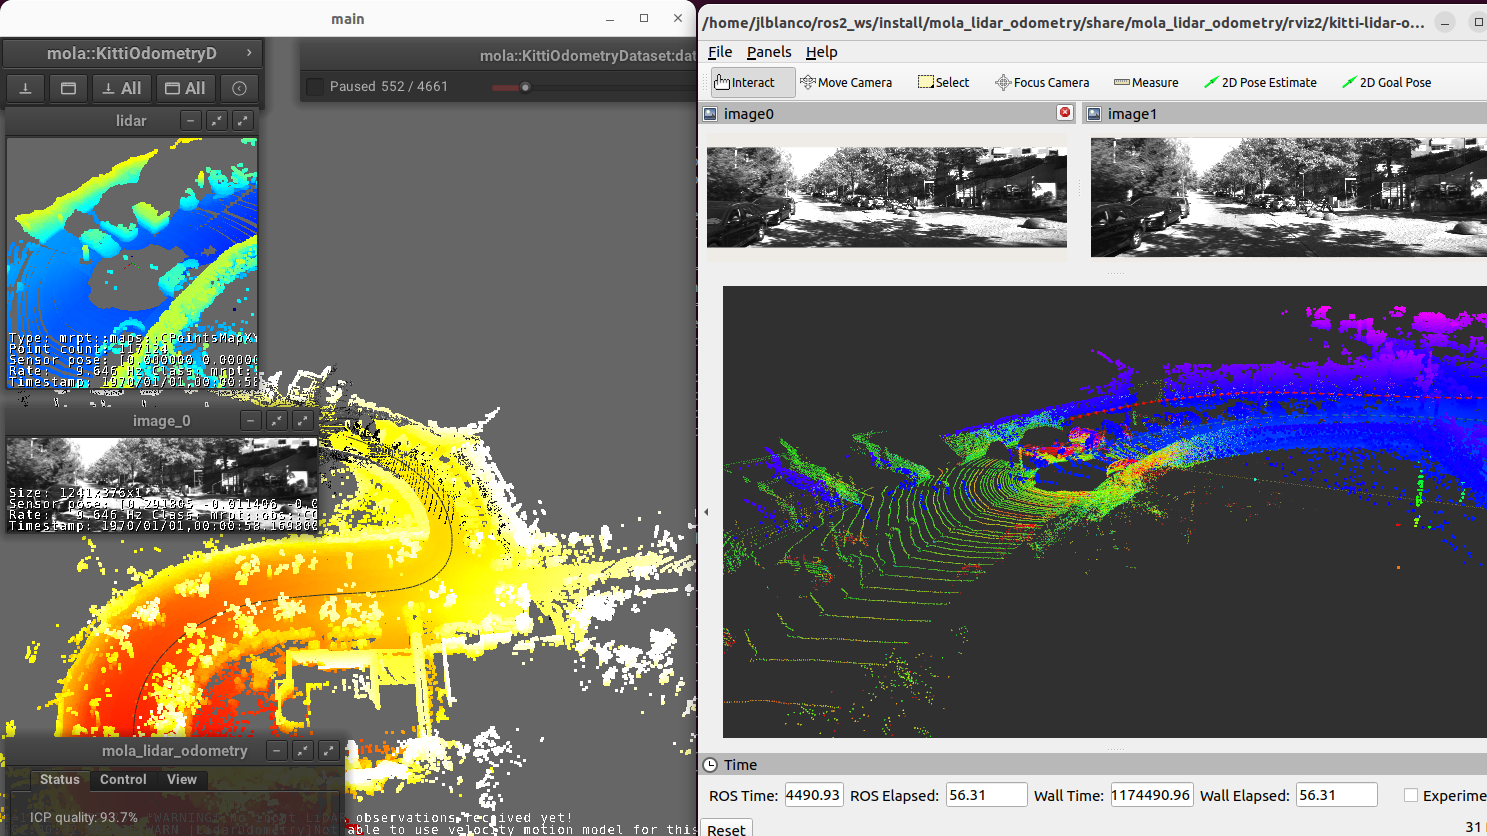
This demo launch file (view sources) runs MOLA-LO on a sequence of the KITTI odometry dataset [GLSU13], demonstrating a few features:
Launching and visualizing LO in both,
mola_vizandRViz2(or use FoxGlove if preferred).How MOLA core modules and
mola_lidar_odometrypublish raw observations from a dataset, the local map, the estimated trajectory, and /tf for the vehicle and all sensors.
How to run it
Download the KITTI Odometry dataset and extract them anywhere, such as the files layout matches the expected tree structure described in class mola::KittiOdometryDataset.
Set the environment variable
KITTI_BASE_DIRto the root “KITTI” directory in the tree layout above:export KITTI_BASE_DIR=/path/to/dataset/
And run it for the desired sequence number:
ros2 launch mola_lidar_odometry kitti-ros2-lidar-odometry.launch.py kitti_sequence:=00
4. Running from ROS 1 bags
ROS 1 bags are not directly supported by MOLA-LO. However, given the large amount of public datasets already published in this format, we provide two pathways to parse them.
Porting to ROS 2 bags: 4. ROS1 ⇒ ROS2.
Converting to MRPT rawlog: 2. rosbag ⇒ rawlog